This guide will introduce the software's essential features so you can start using the application quickly, easily and effectively.
Start the program and follow the examples as outlined below. Please read each section in the order presented. Each section assumes you've read the previous one.
- Miscellaneous User Data
- Notification Letter Templates
- Random Selection Summary & Certification Letter Templates
- Client Directory & Client Profiles
- Consortium Management
- Personnel Rosters
- Consortium: Combined Client Rosters
- Client Personnel
- Random Selection
- Drug Tests: Pre-Employment, Post-Accident, Follow-Up, etc.
- Collectors
- Medical Review Officers (MROs)
- Labs
- Third Party Administrators (TPAs)
- For Your Information (FYI)
The Directory of Collectors is a list of the locations you use to conduct drug and alcohol testing. You can manage a personnel list (staff) for every collection site in the directory.
Every drug and alcohol test in the database references a collection site. The name and address of the collection site is printed on notification letters distributed to personnel who've been selected for a random drug and/or alcohol test.
If all testing through your program are conducted on-site, you may want to add an "On-Site" entry so the notification letter specifies the location of the testing facility.
To open the Directory for Collectors, click the menus:
- Other Data
- Other Directories
- Collector
- Other Directories
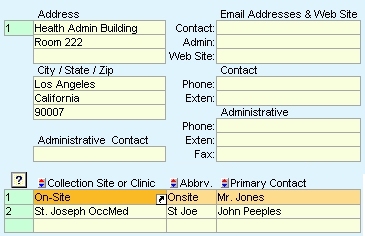
Figure 1-1
Click the Question Mark ![]() (Figure.1-1) to display detailed information about each data item in the spreadsheet. Each line in the spreadsheet represents a "record" and each column represents a "field" in the record. A database is a list of records and a record is a set of fields.
(Figure.1-1) to display detailed information about each data item in the spreadsheet. Each line in the spreadsheet represents a "record" and each column represents a "field" in the record. A database is a list of records and a record is a set of fields.
Note: The spreadsheet displayed in the program may differ slightly from the example in Fig.1-1.
The first line in this example (Line 1 Fig.1-1) lists an "on-site" location. If you're using the software to manage your own company's in-house drug testing program and everyone reports to a single on-site location, you may want to add a similar entry to your directory of collectors. You can also enter the location of an on-site collection facility for each client in your Client Directory. This resource is discussed in the section that covers the Client Directory. Line 2 shows the name of a another clinic that's referenced by the abbreviation St Joe.
In general, you'll want to list all the clinics that conduct your collections. Enter the name of the collection site under the column Collection Site or Clinic and press [Enter] or [Tab] to move to the next field (column).
Enter a unique abbreviation for each entry under the Abbrv column . Throughout the program the abbreviation is used to reference the collection site. Entries without an abbreviation cannot be referenced through other program modules. Press [Enter] or [Tab] to move to the next column.
Enter the name of the person who is the primary contact for the collection site. This field is for reference only and is not printed on the notification letter.
When you press [Enter] or [Tab] to exit Primary Contact the cursor will jump to the first line of the address block at the upper level of the screen.
Three address lines are provided.
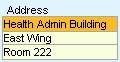
Use as many address lines as needed. These three lines are for the address; not city, state and zip. Press [Enter] or [Tab] to move to the next address line.
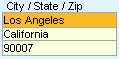
Following the three address lines, enter City, State and Zip.
Press [Enter] or [Tab] to move to Administrative Contact.
After entering a name for the Administrative Contact (you can leave it blank if it not applicable), press [Enter] or [Tab] to move to the Email Address & Web Site block at the upper right side of the screen. Enter the primary contact's email address and the Administrative contact's email address in the first two blocks, respectively, followed by the website address for the facility..
After you enter the Fax number, press [Enter] or [Tab] and the cursor will jump to line 2 in the lower section of the screen where you can enter the second collection site. The address block in the upper level changes as you move through each row in the lower section of the spreadsheet. The data in the address block corresponds to the current record in the lower section. The current record is the one highlighted for entry. In the example above (Fig.1-1), line 1 is the current record.
A notification letter that references the On-Site entry will print the location of the collection site as:
Location of Testing Facility:
On-Site
Health Admin Building
Room 222
Los Angeles, California 9007
If you don't need City, State and Zip to appear in the notification letter, simply leave the fields blank. The heading (Location of Testing Facility) can be changed to suite your application. The resource to change headings is outlined elsewhere in the manual.
Collection Personnel (Staff)
Double click the name of the collection site to open the list of
personnel for that collection facility. You can also right click
anywhere within the cell or left click directly on the short cut arrow ![]() for
a pop-up option to open the list of collectors for that
facility. If you list the collection staff for the facility, the drug and
alcohol records for each test can reference the personnel who collected
the sample for testing and conducted the alcohol test.
for
a pop-up option to open the list of collectors for that
facility. If you list the collection staff for the facility, the drug and
alcohol records for each test can reference the personnel who collected
the sample for testing and conducted the alcohol test.
The FYI Directory is a miscellaneous data table that provides a place for data that's specific to your application. The program does not use the information. It was provided as a convenience for a user by request.
Open the Directory for MROs
Open the Directory for Labs:
Open the Directory for TPAs:
The TPA Directory is discussed in the pamphlet for MROs.
The notification letter prints in 10 sections:
- Title lines
- Company & Donor Name
- Location of Test Facility
- Type of Test to Administer
- Regulation Statement
- Compliance Statement
- Special Instructions I & II
- Declaration of Agreement w/ signature
- Work Sheet Area
The content for each item in red, above, can be specified according to your needs.
You can edit every heading, sub-heading and message content to meet your needs. You should first edit the default template. Custom templates are initialized as a copy of the default template.
If you intend to print notification letters, please edit the template before you generate your first random selection.
To open the default template for editing, choose the menu:
The elements of the Notification Letter are displayed in a tabbed dialog editor. Click through each tab and edit the titles, sub-headings, contents and captions as required by your application of the program.
You can create a custom template for each client. Custom templates are covered in the client profile section.
- Contact & Address
- Title
- Selection Summary
- Misc. Statement
- Compliance
- Certification
- Authorization Signature
When these Items are modified through the print control dialog, they're saved and persist from print request to print request. The master copy is accessed from the Other Data menu option. Use the master to reset the items presented through the print control.
You can edit every heading, sub-heading and message content to meet your needs. You should first edit the default template. Custom templates are initialized as a copy of the default template.
If you intend to print notification letters, please edit the template before you generate your first random selection.
To open the default template for editing, choose the menu:
The elements of the Cover Sheet are displayed in a tabbed dialog editor. Click through each tab and edit the titles, sub-headings, contents and captions as required by your application of the program.
You can create a custom template for each client. Custom templates are covered in the client profile section.
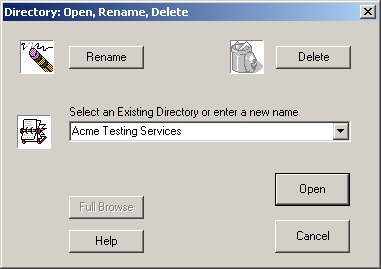
The Client Directory is the main program resource and manages a collection of company names, groups, organizations, facilities or departments. Each entry in the directory is a link to its profile, personnel data and drug & alcohol records.
The Client Directory is also used for consortium management. Assign any client from the directory to a consortium and generate random selections for the entire consortium or its individual members as needed.
This section will illustrate how to:
- Create a Client Directory
- Enter a client name
- Define random testing requirements
- Manage a Consortium
 Figure
4-1
Figure
4-1
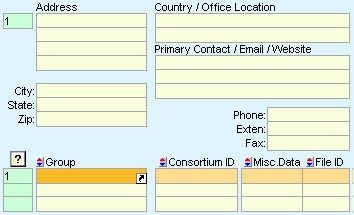
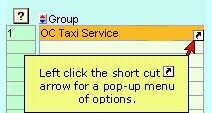
Company names are entered under the Group column. The address block in the upper level of the spreadsheet is used exactly as the Directory of Collectors (see Directory of Collectors).
 Figure
4-2
Figure
4-2Enter your first Client name in row one under the Group column, press [Enter] or [Tab].
 Figure
4-3
Figure
4-3With your left mouse button, click the short cut arrow
 Figure
4-4
Figure
4-4
The popup menu (see Figure 4-4) is also activated if you right click anywhere inside the cell.
- Contact
- Address
- %Control
- Pre-Sets
- Billing
- Exclusion
- DOT
- Misc
- On-Site
- Export
- Letters
DOT MIS Report
The DOT (U.S. Department of Transportation) MIS report lists a Certifying
Official (Company drug test liaison) and includes a line for the official's
signature. If you indicate the Primary or Administrative contact as
the certifying official, the program will pre-print their name and telephone
number on the MIS report. If you choose Neither then only the
signature line is printed.
All program generated reports use the billing address. The physical address was provided on request by a user but is available simply as an FYI.
![]() Click the Read-Me button
to learn how to set the parameters on this page.
Click the Read-Me button
to learn how to set the parameters on this page.
![]() Click the
Setup
Annual % button to use a program assistant to specify the yearly percentages your program
needs to achieve for the year.
Click the
Setup
Annual % button to use a program assistant to specify the yearly percentages your program
needs to achieve for the year.
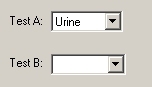
Tests A&B
The software is designed to generate a
random selection for both a drug and an alcohol test in a single draw. Test-A & Test-B are used to specify the test types. To select for
both a drug and an alcohol test, designate the type of drug test in Test-A and
the type of alcohol test in Test-B.
Click the dropdown arrow ![]() to
select a substance test in Test-A and an alcohol test in Test-B (see Figure
4-1).
to
select a substance test in Test-A and an alcohol test in Test-B (see Figure
4-1).
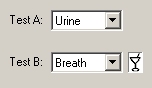 Figure 4-1
Technical Note: The test type specified in Test-A is the test for which more people will be selected than the one specified in Test-B. For example, if you need to pick 20 people for drug testing (Urine) and 5 people for alcohol testing (Breath), Test-A must be specified as Urine. You cannot specify the same type of test in both A&B at the same time. An alcohol test can only be selected into Test-B or Test-A but not both at the same time. If you select Breath into Test-A and need to change it to Test-B, you'll have to select the blank line into Test-A before you can select Breath into Test-B. The program reports an error if you try to violate this rule.
 Figure 4-2
Check the option Testing is Mandated (DOT) to instruct the program to use Mandated Billing Rates (see Billing page).
The example in Figure 4-2 specifies annual selection parameters:
- 50% for drug testing (Test-A is Urine)
- 10% for alcohol (Test-B is Breath)
- 2 Alternates (by percentage or count)
- 4 (Quarterly: No. of Selections Scheduled for Year nSched = 4 )
- 01-01-2005 Start Year to Date (Current Year Starts on Jan. 1st.)
The program performs the following counts & calculations every time a random selection is requested for drug & alcohol testing:
- Count the random drug & alcohol tests collected since the date
specified in Start: Year to Date.
Note: Random drug & alcohol test records are not counted if a collection date for the test has not been entered. Random drug & alcohol tests that were collected prior to the date are not counted. - Calculate the average size of the personnel list to determine the number of tests required for the year (nTests).
- Determine how many random selections have been conducted for the year (nRandoms)
- Calculate the drug test percentage achieved to date
- Calculate the Alcohol test percentage achieved to date
Number of drug tests required for the year at 50% Annually: nDrug = (Average List Size)*.5
Number of alcohol tests required for the year at 10% Annually: nAlco = (Average List Size)*.1
Percentage Options
These options control how the random selection numbers are interpreted and how
alternates from multiple locations are selected.
The values (A-Selection% & B-Selection%) are considered target percentages. To interpret a values a count and not percentage, check its corresponding option: Use as Counts - Not %.
For example, if you enter 10 in the A-Selection % and check the Primary/Use as Counts -Not % option, the selection control generator will preset the number of people to select as 10 and then display the percentage of that list that 10 people represent.
If Absolute % is checked, the percentage percentage calculations are not performed. The random selection control is initialize with the percentage you enter in the profile.
| % | When the Option is Checked . . . |
| Primary | The values entered for the A&B Selections will be used as Counts and the percentages will be calculated. |
| Alts | The values entered for the A&B Selection for Alternates will be used as Counts (number of people) and the percentages will be calculated. |
| Location | When a list has people from multiple locations, the number of alternates requested is picked from each location when one or more representatives from that location are randomly selected. |
| Absolute | Usually "Year to Date" percentages are determined by the number of selections you're going to generate for the year (quarterly, monthly, weekly, etc. ) and the target percentages specified. If this option is checked, the percentages entered for each test are used every time the random control generator is requested - Year to Date calculations are not executed. |
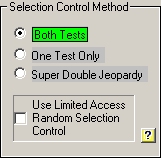
Selection Control Methods are not currently used. They will be reserved for a future release of the software and will be used for batch processing of random selections.
See Figure 4-3 & 4-4
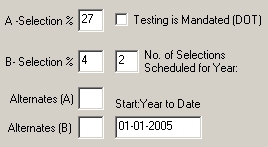 Figure 4-3
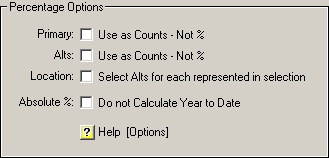 Figure 4-4
None of the Percentage Options are checked.
You will generate random selections once a month from July through December (6) and you need to select 1 Alternate each time.
See Figure 4-5 & 4-6
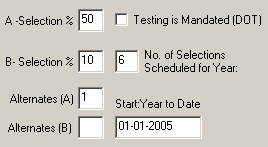 Figure 4-5
Note: Start: Year to Date is set to the beginning of the year since the date tells the program when to start counting the drug and alcohol tests already collected so as to determine how many are yet to be collected. Since no tests exist in the database for this client, you can set the date to the beginning of the year.
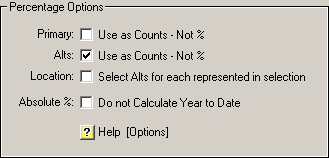 Figure 4-6
Note: If you do not check the Alts option (Fig 4-6), the random selection control will interpret the 1 entered in Alternates (A) (Fig.4-5) as 1% and not a count of 1.
See Figure 4-7 & Figure 4-8
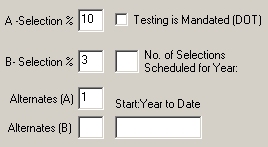 Figure 4-7
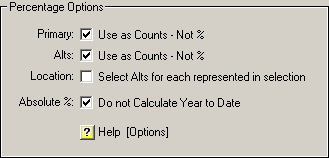 Figure 4-8
Note: If you do not check the options for Primary & Alts (Fig 4-8), the random selection control will interpret the 10, 3 and 1 entered for A-Selection%, B-Selection% & Alternates (A) (Fig.4-5) as 10%, 3% and 1% respectively.
Since Year to Date percentage calculations are not needed, Start: Year to Date and No. of Selections for Year are not specified.
For example, if two people are picked from Location A, 1 person picked from Location B and no-one selected from Location-C, the program will pick 1 alternate from Location A, 1 Alternate from Location B and no alternates from Location-C.
See Figure 4-9 & 4-10
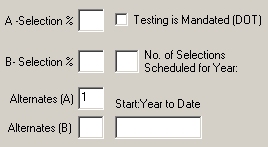 Figure 4-9
To pick 2 Alternates from each Location represented in the random selection, enter 2 in Alternates (A).
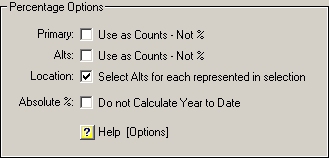 Figure 4-10
If you preset these parameters in the Client Profile, you will not have to specify the same parameters every time you generate a random selection. The random selection generator will get the information from the Client Profile.
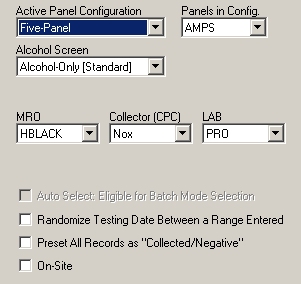 Figure 5-1
Panels in Config: The list of substances in the selected Panel Configuration. This dropdown list is provided for your information so you can verify the panel that's selected.
Alcohol Screen: Always pick an alcohol screen if you're selecting for a separate alcohol test. The Alcohol screen is used to report your costs for testing. You can enter as many Alcohol Screens as required by your application. Alcohol screens are entered in the Panel Configuration Directory with other Panel Configuration under the Other Data menu. Costs are covered in another section of the manual.
Collector: The collection facility that collects the samples.
LAB: The lab that performs the analysis.
Preset All Records as Collected/Negative: This will saves a few data management tasks.
When this option is checked, the collection status for everyone randomly selected is automatically set to "Collected & Negative."
The result of the substance test is set to Negative (when someone is selected for a substance test) and the alcohol screen level is set to 0.0 and the result set to negative (when someone is selected for a alcohol test).
For example, 30 people are selected, but only 28 were actually tested: When the preset option is ON, only two people will need to be located in the results table to set their donor sample status as "Not Collected." Then the preset option if OFF, 28 people will need their collection status managed.
On-Site: Check the "On-Site" option to indicate the collection was performed at the company's facility. The notification letter will print the location of the collection facility from the information entered in the On-Site tab of the Client Profile. If this option is not checked, the notification letter will print the location of the collection facility from the entry in the Collector's Directory for the Collection Site specified.
- Random Selection Summary Options
- Summary Report Page Breaks
- Optional Random Selection Reports
- Cover Sheet and Notification Letters
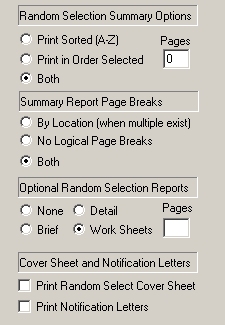 Figure 6-1
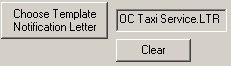
To create a new template, click the button to Edit Content for either the Cover Sheet or the Notification Letter (see Figure 7-1). The discussion here will use the Notification Letter to illustrate the steps required.
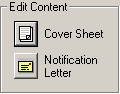 Figure 7-1
 Figure
7-2
Figure
7-2
 Figure
7-4
Figure
7-4
The option below (see the Letters page of the Profile Editor) is currently not used and is reserved for a future release of the program (see Figure 7-5).
![]() Figure
7-5
Figure
7-5
For example, John Doe Trucking, is a independent owner/operator. His entry in the Client Directory is listed as John Doe Trucking and his personnel roster has only one person listed; John Doe.
If John Doe joins a consortium, his name will be thrown into the combined personnel list of all the consortium members.
When a random selection is generated from the combined membership list, John Doe has the same chance of being picked as anyone else in the list.
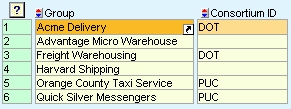
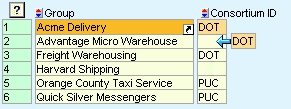
Every entry in the Client Directory with a common Consortium-ID identifies the entry as a member of the same consortium named by the Consortium-ID.
In the example below, two consortia are defined (see Figure 8-1).
- DOT
- PUC
A consortium can be named to meet the needs of your applicaiton. DOT & PUC are simply two examples.
The DOT consortium has two member companies:
- Acme Delivery
- Freight Warehousing
The PUC consortium has two members:
- Orange County Taxi Service
- Quick Silver Messangers
 Figure
8-1
Figure
8-1
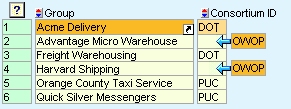
The OWOP consortium now has two members:
- Advantage Micro Warehouse
- Harvard Shipping
 Figure
8-2
Figure
8-2
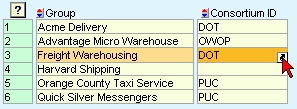
Add a new Consortium member to DOT simply by entering "DOT " as the Consortium ID for the entry shown (see Figure 8-3).
 Figure
8-3
Figure
8-3
The DOT consortium now has three member companies:
- Acme Delivery
- Freight Warehousing
- Advantage Micro Warehouse
To open the combined personnel roster for all the DOT consortium members, click on the short-cut arrow for one of the consortium IDs (see Figure 9-1).
Note: You cannot edit personnel data when the personnel list is opened for the entire consortium. Open the personnel list for a client to edit the data.
 Figure
9-1
Figure
9-1
From the popup menu, choose Pool List: Combine Member Lists . . . (see Figure 9-2).
 Figure
9-2
Figure
9-2
Optionally, you can double click directly on the Consortium ID (DOT) to open the combined personnel list of all the members.
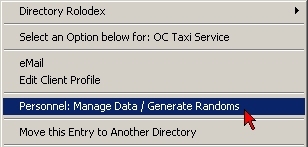
Open a client's personnel roster to edit, add or delete personnel records or generate a random selection.
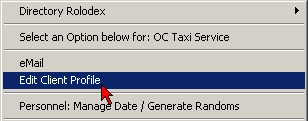
From the Client Directory, using the left mouse button, click the short cut arrow ![]() for a popup menu of options for this client (see Figure 9-1).
for a popup menu of options for this client (see Figure 9-1).
Figure
10-1
 Figure
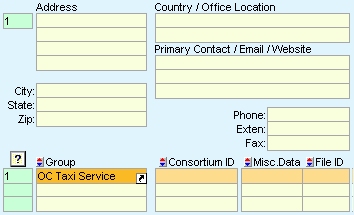
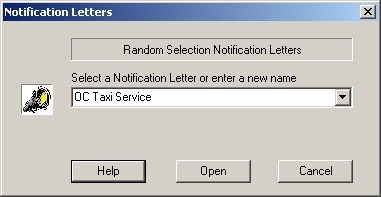
10-2
Figure
10-2
You can also double click directly on OC Taxi Service to open the personnel list without the menu.
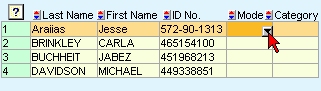
Enter names and ID numbers. If you intend to generate DOT MIS reports, you must specify a Mode & Category for each person in the list. In general, everyone in the list must be the same Mode for DOT MIS data management and compliance with DOT reporting.
DOT Modes:
- FAA
- FMCSA
- FRA
- FTA
- PHMSA (Previously RSPA)
- RSPA
- USCG (Coast Guard)
Visit the DOT website for information about random testing rates: http://www.dot.gov/ost/dapc/
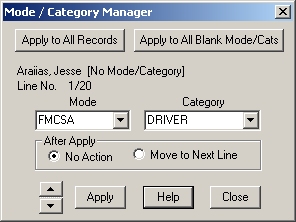
Move your cursor into the Mode cell and click the dropdown arrow to open the Mode/Category Manager (MCM) (see Figure 10-3). The MCM is also opened if you double click directly into the Mode cell.
 Figure
10-3
Figure
10-3
The Mode/Category Manager will display over the spreadsheet (see Figure 10-4).
 Figure
10-4
Figure
10-4
Click the Help button for instructions regarding the use of this resource.
Edit personnel data and click Save from the menu bar to save your data modifications.
From the Randoms menu at the top of the personnel window, choose a random selection generator:
- Random Select: Super Double Jeopardy
- Random Select: General Selection
Under the same menu see Help: What is Super Double Jeopardy to learn the difference between the two options.
If you've setup %Control & Preset Parameters through Client Profile, the corresponding parameters and percentages will initialize the random selection parameters.
Random Selection Parameters:
If only one type of test is planned, drug or alcohol, select the test type in Test-A and leave Test-B blank.
Technical Note: The test type in Test-A is the test for which more people will be selected than the test type specified in Test-B. For example, if you need to pick 20 people for drug testing (Urine) and 5 people for alcohol testing (Breath), Test-A must be specified as Urine. An alcohol test can only be selected into Test-B or Test-A but not both at the same time. If you select Breath into Test-A but need to change the setting and select Breath into Test-B instead, you'll have to select the blank line into Test-A before you can select Breath into Test-B. The program reports an error if you try to violate this rule.
Figure
11-1
 Figure
11-2
Figure
11-2
 Figure
11-3
Figure
11-3
If you enter a percentage for either Test A or B, and press the [Tab] key or click to a new cell, the corresponding count is calculated and rounded up to the nearest whole number and the percentage is recalculated to reflect the rounded count. If the calculation results in a different percentage, the new value is displayed.
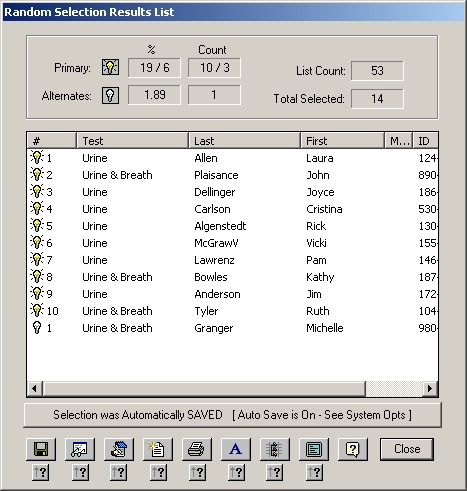
For example, the number of people in the list = 53
If you enter 10% and press [Tab] or click into another cell, you'll see "6" displayed in the count column and the percentage will change from 10 to 11.32.
10% of 53 = 5.3 people
5.3 is rounded to 6 and the percentage is recalculated as 6/53 = 11.32%
Similarly, if you enter or change the count, its corresponding percentage will be calculated and displayed. For example, if you enter 7 as the number of people to pick, the percentage is calculated as: 7/53 = 13.21%
 Figure
11-4
Figure
11-4
3 of the 10 selected for drug testing will be selected for a alcohol test too.
Note: This random selection will pick 1 Alternate and report that the person selected must submit to both a Drug and an Alcohol test. If you check the option Do Not Specify Test Types for Alternates (see the check box in Figure 11-4), the report will list the the name of the alternate without a drug and alcohol test types specified.
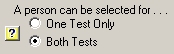
There are two options to control the General Selection Method: One Test Only & Both Tests (see Figure 11-5)
 Figure
11-5
Figure
11-5
Both Tests:
One Test Only:
 Figure
11-6
Figure
11-6
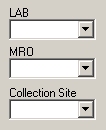
Select the Lab that will analysis the donor
samples and the MRO who reviews your test results. These items are
provided at the time the random selection is generated in order to
initialize resulting drug & alcohol records created for each person
selected. The Lab & MRO do not have to be specified at the time of the
random selection. You can manage the data later if needed.
Print options are presented when the random selection is complete. Print options include Notification Letters. One letter is printed for each person in the random selection with instructions for testing and includes the location of the collection site selected here.
![]() Figure
11-7
Figure
11-7
When this option is checked, the collection status for everyone randomly selected is automatically set to "Collected/Negative."
The result of the substance test is set to Negative (when selected for a substance test) and the alcohol screen level is set to 0.0 and the results set to negative (when selected for a alcohol test).
For example: 30 individuals are selected, while only 28 samples as collected.
When the preset option is checked, only two individuals need to be located in the results table to set their donor sample status as "Not Collected." When the preset option if OFF, 28 people will have to be located in the results table to manage their collection status.
If you choose the On-Site option, the On-Site information is retrieved from the Client Profile and used as the collection site location for Notification Letters.
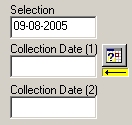
The Selection Date (see Figure 11-8) is initialized to today's date and represents the date the random selection was generated. The parameters of the random selection are saved to an audit table for reference. You can change the date if necessary.
 Figure
11-8
Figure
11-8
If you know the intended date the tests will be conducted and the donor samples collected, you can specify the date before the random selection is generated. The date you enter will be assigned to the drug and alcohol records created and will save data management time later. Leave the date blank if you do not know the date.
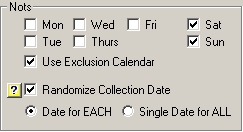
Check the option Randomize Collection Date to assign a random date for collection to each person selected for testing. When this option is used, the Collection Date (2) is used to define a calendar period in which random dates are picked and assigned to each person that's selected (see Figure 11-9).
 Figure
11-9
Figure
11-9
Each person pick in the random selection is assigned a random collection date that's picked from the period defined by collection dates (1) & (2). The dates are not unique; two or more people may be assigned the same random date.
For example, if Collection Date(1) is 01-01-2005 and Collection Date(2) is 03-31-2005, then random dates in January, February and March will be picked. The random selection summary report will show the collection date for everyone selected.
Other Options: (see Figure 11-9)
Date for Each: Choose this option is a random date is picked for each person selected.
Single Date for ALL: One random date is picked from the period specified and assigned to everyone selected. The same date is assigned to every person in the random selection.
Check the Not Days if you do not want to generate a collection for specific days of the week.
Check the option Use Exclusion Calendar so random dates found in the Exclusion Calendar are not used. See the Other Data menu to access the Exclusion Calendar. You'll want to add dates for Holidays and other days in the year for which you do not want to conduct testing.
The second collection date is used to define a calendar period in which random dates are picked and assigned to each person that's selected. To
 Figure
12-1
Figure
12-1
Selections preceded with ![]() were selected for a drug and/or an alcohol test.
were selected for a drug and/or an alcohol test.
Selections preceded with ![]() were selected as Alternates.
were selected as Alternates.
![]()
Random selections are automatically saved to the Results Table for the Client. If the random selection was from a Consortium, the results are saved and can be retrieved by reference to each Client or the Consortium.
The Auto-Save feature can be changed through System Options. See the menu Other Data to access System Options.
| Options | |
This option saves the selection to the history data file. The selection is appended to the end of an existing files. The program will create a new file if it does not exist. |
|
| Open a results table for this client or consortium for viewing and editing. If the file doesn't exist an empty spreadsheet is presented for editing. | |
| Generate and automatically name the
notification file. The file name is based on the current
personnel roster.
The notification file is a tab delimited record set of the selection results. Use it to email results or generate form letters with Microsoft Word Mail-Merge. See the help system for detailed information about the notification file. |
|
| This option presents the standard open dialog through which the user can enter the name for the notification file. The file extension is automatically assigned "NTX." The notification file is a tab delimited record set of the selection results. Use it to email results or generate form letters with Microsoft Word Mail-Merge. See the help system for detailed information about the notification file. | |
| Select this option to print the selection list. SET YOUR FONTS - See Font Button below. | |
| Manage printer fonts.
Recommended Fonts: Arial size 8, 9 or 10. Select "Bold" for Title-1 & Title-2. |
|
| Full Screen (Not Implemented) | |
| System Options |